


GitPrimer
Everything except for widelands-media is hosted on both Codeberg and GitHub. These two hosting providers can be used interchangeably thanks to a mirror bot. This page explains how to obtain the source code and how to work with it. We are providing instructions for how to do it on the command line / in a terminal, but we recommend that you also use a GUI client to make your life easier.
The instructions in this article assume you use GitHub; for Codeberg, simply substitute github.com/widelands/ with codeberg.org/wl/. The web interface for both platforms is almost identical.
- Main differences to bazaar
- Installing Git
- Getting the Source Code
- Working on and contributing code
- Comparison with Bazaar
- Workflow
- Checking out into subdirectories
- Using ssh instead of https
- Checking out a branch from somebody else's fork
- Checkout out and tracking a remote branch
- warning: inexact rename detection was skipped due to too many files.
- Useful Links and Tutorials
Main differences to bazaar
When using bazaar, you probably have each branch in it's own directory. When using git, you have only one directory. git handles all branches in this directory and changing to a branch is done with the command git checkout BRANCHNAME. This command applies the changes made in BRANCHNAME to the files in this directory. E.g. the command git checkout master revert all files in this directory to the state of the master branch.
Installing Git
First, you will need to download install Git on your machine. Follow the instructions on the Git Downloads page. We also recommend that you get a GUI client.
Getting the Source Code
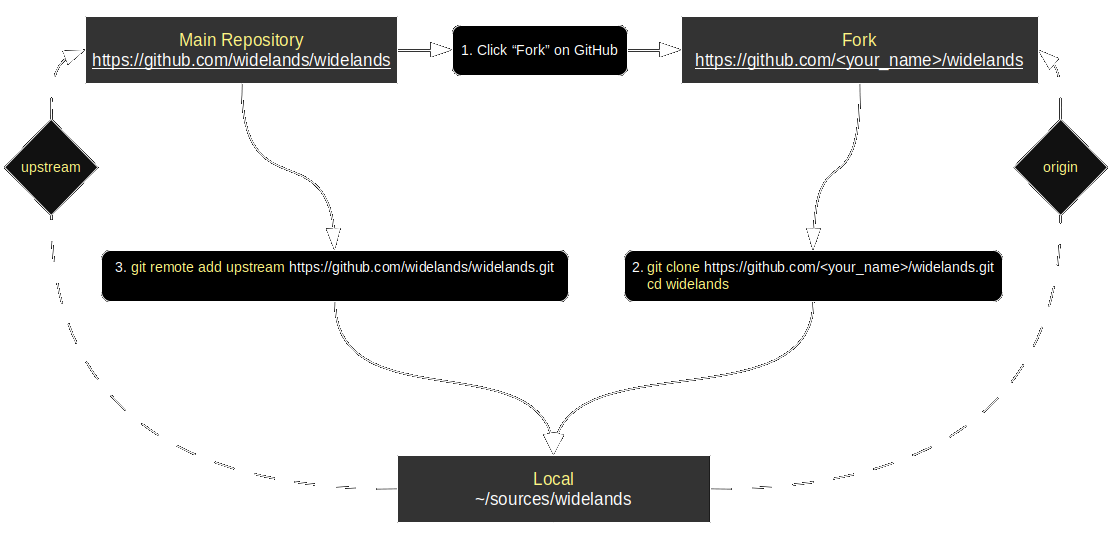
Rather than working on the Widelands repository directly, you will create your own fork, work on a branch there and then make a Pull Request when your code is ready. If you don't expect to be working on the code and only want to play the development version, call git clone https://github.com/widelands/widelands.git --depth 1 on the command line and you're done.
1. Create a fork
- Visit https://github.com/widelands and pick the repository that you want to clone. For the Widelands game, this will be "widelands". We will be using this as an example throughout, but it works the same for all our repositories.
- Hit the "Fork" button. This will create a new Git repository on GitHub at
<username>/widelandsthat links back towidelands/widelandson the GitHub website.
2. Download the code
We want to set up both your fork ("origin") and the original ("upstream") repository on your machine. Your fork is for you to work on, and the upstream repository is for keeping up with the changes in our master branch. We will also be using the "depth" parameter to speed things up - if you want the full commit history, just leave it out.
- Open a command line / terminal and
cdto where you want to clone widelands. - Visit
<username>/widelandson GitHub and locate the green "Clone or download" button. This will give you a link to copy that looks likehttps://github.com/<userame>/widelands.git. - Paste the link that you just copied to run
git clone git@github.com:<username>/widelands.giton your command line / in your terminal. This will pull your fork down onto your machine and check out the
masterbranch. Your fork will be known asoriginto the Git system.
Note: You can speed up downloading by calling git clone https://github.com/<userame>/widelands.git --depth 1. This will download only the last revision. But this will prevent you from keeping your fork in sync with the main repository, because all revisions will be needed to do so.
-
You will now have a subdirectory called 'widelands', cd into it:
cd widelands -
Link up the original by running :
git remote add upstream https://github.com/widelands/widelands.gitThis will now be known as
upstreamto the Git system.
Working on and contributing code
If you plan to be working on multiple branches at the same time, see Checking out into subdirectories - we haven't worked out the details of that one yet, so please feel free to contribute to this Wiki page.
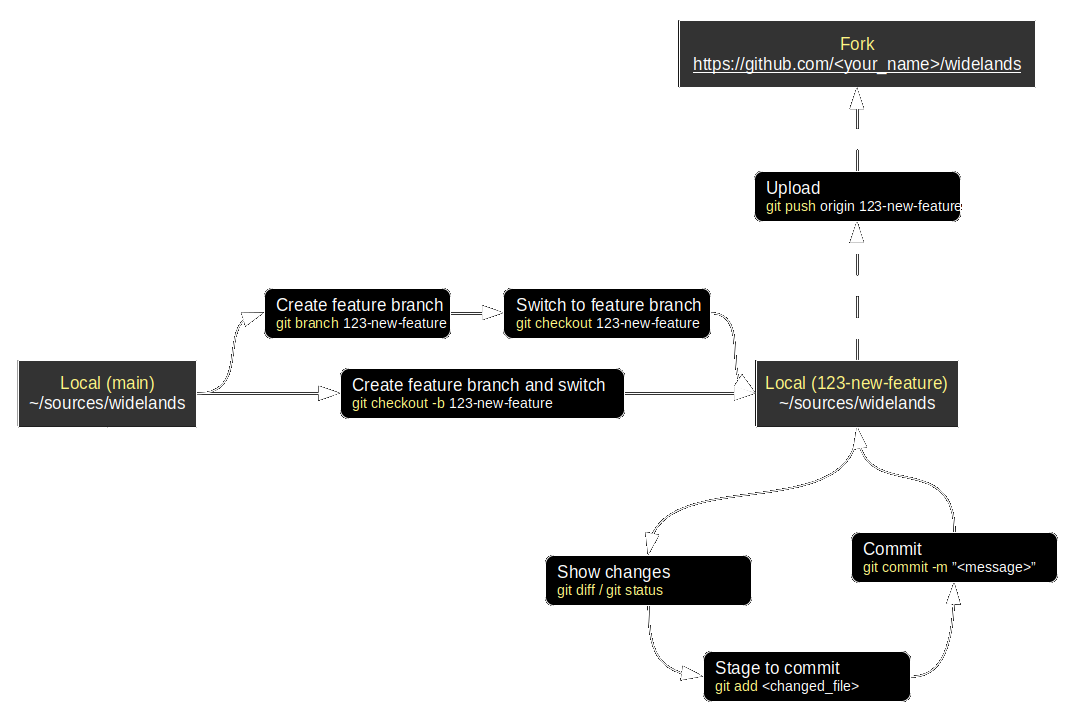
1. Create a branch
You should always work in a separate branch for each feature and never on the master branch. For creating a branch, run git checkout -b <branch_name>.
2. Commit and upload your changes
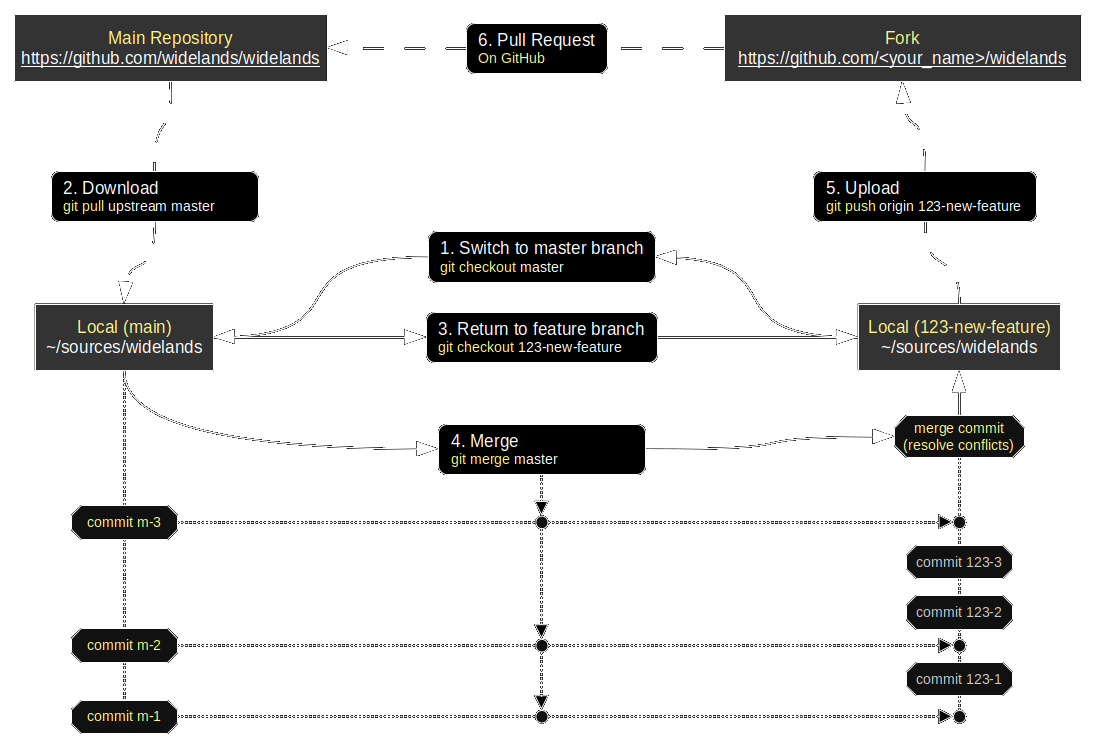
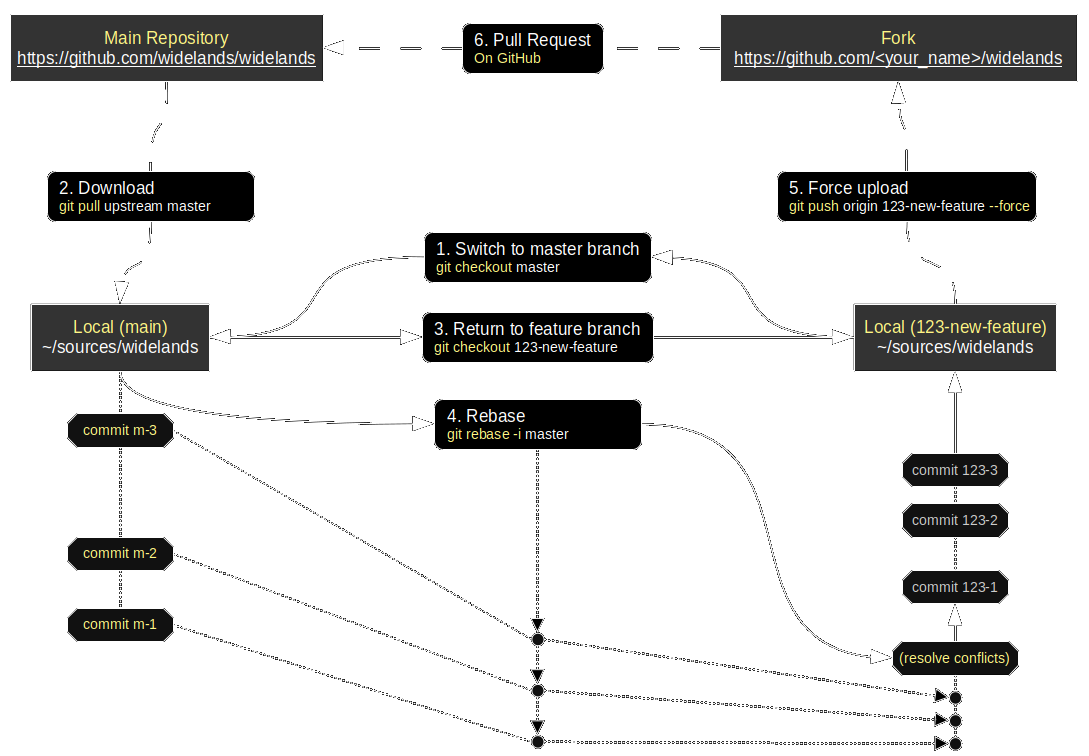
You should always keep in sync with upstream's master branch. Call git pull upstream master and follow the instructions. Once you feel comfortable with Git, you can also consider rebasing instead.
After Buildingwidelands and making your changes, you can do a local commit.
- You can see which files have changed by running
git statusand see a diff by runninggit diff. - ** Note:** Unlike Bazaaar where you only need to
bzr addnew files, you will need to rungit addfor all the files that have any changes in them! This is the bit where we recommend using a GUI client. - After running
git addfor your changes, you can commit them by runninggit commit -m "Commit message". Reference the issue that your working on with#, e.g. "Fixes #123". This will link your branch to issue No. 123 in the GitHub issue tracker. Since thr same issue can have two different numbers in our two bugtrackers (Codeberg and GitHub), please also prefix it with "GH" or "CB" to clarify which one the number refers to, e.g. "Fixes GH #123". - Finally, push your changes with
git push origin <branch_name>.
Note: If you did not add any new files, you cann add and commit at the same time by running git commit -am "Commit message".
3. Get your changes into the game
Once you are happy with your branch, it's time to hit the "Pull Request" button on GitHub, so that your branch will be merged into our master branch.
- Describe what your change does
- If your branch adresses any of our issues, mention the issue(s)
- Your pull request and each subsequent push to your branch will trigger automated builds on Travis and AppVeyor. Check out the protocols for these builds to see if they were successful and whether there are any new compiler warnings or test failures to fix.
- GitHub will also send you an e-mail when a reviewer adds a comment.
Comparison with Bazaar
| Action | bzr | git |
|---|---|---|
| Switch to trunk | cd ../trunk |
git checkout master |
| Update trunk and merge into local branch | cd ../trunk; bzr pull lp:widelands; cd ../<branch>; bzr merge ../trunk; bzr commit -m "Merged trunk." |
git pull --rebase upstream master; git push origin <branch> --force |
| Show branches, with the current one highlighted | Use operating system to list directories | git branch |
| Delete remote branch | Use Launchpad interface | git push origin --delete <branch_name> |
| Delete local branch | Use operating system to delete directory | git branch -d <branch_name> |
| Undo all changes | bzr revert |
git checkout . |
| Undo changes to a file | bzr revert <file> |
git checkout <file> |
| Get a remote branch and switch to it | bzr branch <remote_branch_name> <new_local_branch>; cd <new_local_branch> |
git checkout -b <new_local_branch> <remote_location>/<remote_branch_name> |
| Redo the last commit, e.g. to fix typos in the commit message | bzr uncommit then bzr commit -m <message> |
git reset --soft HEAD^ then git commit -a -c ORIG_HEAD |
See also Merging in bzr: The git approach vs the bzr approach
Workflow
Getting the code
Working on your code
Synchonizing with the main repository / master branch
Merging
Rebasing
Checking out into subdirectories
Since our bottleneck is compile time rather than disk space, we will want to be able to check out into subdirectories, just like Bazaar does it. There are 2 ways of doing this:
- Clone the full repository into a new directory and set up the remotes each time. This will support submodules (we are currently not using submodules, so don't worry about this). This will be very time/bandwith consumig as the whole repo will be transfered again. Instead of cloning every time, you can also duplicate your master directory manually (
cp -r widelands <branchname>) which is usually faster and requires no bandwidth. - Use
git worktree(manual blog). This command will create a separate copy of submodules too, but can handle only 1 level.
Using ssh instead of https
Tired of typing your pasword all the time? If so, this section is for you.
If you do not have an SSH key already, follow the instructions on GitHub. If you already have a public ssh key, you can reuse it with GitHub.
- Upload the public key to your settings.
- Once provided you can use ssh instead of https for every GitHub related command e.g.
git clone git@github.com:widelands/widelands.git - The GitHub GUI provides the needed path when you click on "clone or download" on the repository page
You may have to adapt the file ~/.ssh/config and add these lines:
Host github.com
    User git
    IdentityFile PATH/TO/SSH-KEY
    AddKeysToAgent yes
Leave all entries as shown and change only the PATH/TO/SSH-KEY.
If you have formerly used https you have to change also the urls in the file folder_of_repo/.git/config by replacing https://github.com/ with git@github.com:, e.g. for "upstream":
From:
[remote "upstream"]
    url = https://github.com/widelands/widelands.git
    fetch = +refs/heads/*:refs/remotes/upstream/*
To:
[remote "upstream"]
    url = git@github.com:widelands/widelands.git
    fetch = +refs/heads/*:refs/remotes/upstream/*
Checking out a branch from somebody else's fork
Assuming somebody else's fork is called 'smbd_else_fork' and the branch is called 'new_feature':
$ git clone https://github.com/widelands/widelands.git --depth 1
$ cd widelands/
$ git remote add smbdy_else_fork https://github.com/smbdy_else_fork/widelands.git
$ git fetch smbdy_else_fork --depth 1
$ git checkout new_feature
The last message you see should be:
Branch 'smbdy_else_fork' set up to track remote branch 'new_feature' from 'smbdy_else_fork'.
Switched to a new branch 'new_feature'
And this is what the commands mean:
$ git clone https://github.com/widelands/widelands.git --depth 1
$ cd widelands/
Clone the main Widelands repository and change into its directory. You only need to do this if you haven't already. --depth 1 means you only fetch the latest revision, which will speed things up. You have to omit that if you want to keep your local copy in sync with the main repository.
$ git remote add smbdy_else_fork https://github.com/smbdy_else_fork/widelands.git
Register the fork of somebody else fork and call it "smbdy_else_fork". You can als choose another name by using git remote add another_name https://github.com/smbdy_else_fork/widelands.git
$ git fetch smbdy_else_fork --depth 1
Register what's in smbdy_else_fork. Again, --depth 1 will speed things up. Git should tell you about the branches that it has found at this point.
$ git checkout smbdy_else_fork/new_feature
Switch to the branch.
Note: If you want to change forks for your local branch, call
git branch -u otherniftyfork/niftybranch
Note: In principle, you can git add as many forks as you want on your local machine and call them anything you want. You can get a list by running git remote -v.
Checkout out and tracking a remote branch
This is how to checkout a remote branch from a specific fork and register it as the push and pull location for the branch. First, you get the information about the branches in the fork and their status:
$ git fetch niftyfork
Then you switch to the branch while telling it to track the remote source:
git checkout -t niftyfork/niftybranch
Now you can push and pull by simply calling:
git push
git pull
To list the relationships between local and remote branches, call
git branch -vv
warning: inexact rename detection was skipped due to too many files.
You can get rid of this warning by running
git config merge.renamelimit 10000
You can then abort your merge with
git merge --abort
And do a fresh merge after that.
Useful Links and Tutorials
- Official git documentation + book
- Getting started with GitHub
- TortoiseGit GUI