


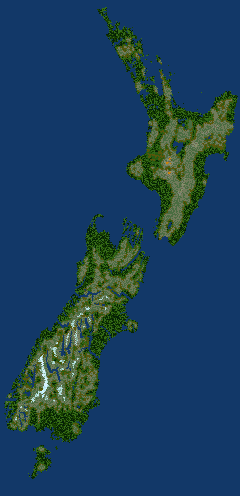
Map: New Zealand - From Contract to War
Description:
The story is written with normal letters and INSTRUCTIONS WITH CAPSLOCK ON. Barbarians or atlanteans are the best fit for maori and thus suggested to be used for that. Play with empire. ---------------------- It is year 1840 and you, Captain William Hobson, are chosen to be the first governor of Aotearoa - or New Zealand as we call it. Over the past fourty years an intertribal Musket wars have ravaged the land. As more and more british settlers arrive to settle the land, there's an ever stronger need to make some kind of contract with chieftains to avoid fights between them and settlers. Many tribes also see this as a chance to end tribal wars and gaining of protection from the other colonial power. It is your duty to draft an acceptable contract and gain signatures from each chieftain under it. EPISODE ONE - PLAY FROM BLUE PLAYER'S LOCATION AND TRY MEET EACH CHIEFTAIN BEFORE IT IS TOO LATE. SELECT ARTEFACTS AS THE PLAYING MODE. THERE ARE ELEVEN ARTEFACTS VISIBLE TO THE SHORE AND EACH ARTEFACT REPRESENTS A MEETING POINT WHERE YOU CAN GAIN A SIGNATURE FROM ONE OF THE CHIEFTAINS. MAKE AN EXPEDITION AND FIND THOSE PLACES. THEN DECIDE WHICH ONE TO PURSUE FIRST, SECOND, THIRD, ETC. BE QUICK, IT GETS HARDER OVERTIME. IF AN ARTEFACT IS ALREADY STRONGLY UNDER SOME OTHER TRIBES' CONTROL, THAT LEADER HAS DONE HIS DECISION AND IS NO LONGER AVAILABLE TO NEGOTIATE. DO NOT ATTACK, ONLY DEFEND IF NECESSARY. YOU CAN PLAY THIS IN PEACEFUL MODE OR WITH HOSTILITIES. THERE ARE DIFFERENT LEVELS OF SUCCESS OUTLINED FOR BOTH VERSIONS IN THE END OF THIS DESCRIPTION. WITH HOSTILE ADVERSARIES YOU CAN CHOOSE TO PURSUE EITHER HIGHEST TEMPORARY AMOUNT OF OWNED ARTEFACTS OR HIGHEST WHEN ALL OF THE ARTEFACTS ARE UNDER SOMEONE'S CONTROL. REGARDLESS OF HOW IT ENDS, YOU CAN CONTINUE TO EPISODE TWO IF YOU LIKE. ---------------------- Unfortunately the contract had a major flaw built in it as maori language lacked one crucial word - governance. It did not take long until the contract was contested, resulting in terrible loss of trust. Series of wars between british empire and maori ensued with a result of about million hechtares of land lost to the crown. Majority of these wars were fought on north island between 1860-1870. EPISODE TWO - CHOOSE WHICHEVER START LOCATION YOU LIKE, ALTHOUGH RED, WHITE OR ORANGE ARE SUGGESTED. YOU CAN SELECT ALL VS. ALL OR YOU VS. ALL. DISABLE BLUE PLAYER'S STARTING LOCATION IF YOU DIDN'T CHOOSE IT. CHOOSE MAJORITY OF LAND AS WIN CONDITION. IN THIS SCENARIO GAINING MAJORITY MEANS THAT THE REST OF THE OPPOSITION SURRENDERS. MOST PROPABLY YOU CAN'T WIN WITHOUT HAVING SOME AREAS FROM THE OTHER ISLANDS AS WELL. ----------------------- The map might also be suitable for multiplayer with the following configuration: Disable blue and white players' start location and play all vs. all or with two or three teams. With two teams the strongest player of the team must be alone on the other island and two weaker players on the other. ---------------------------------------------------------- LEVELS OF SUCCESS FOR THE FIRST EPISODE - PEACEFUL MODE - 4-5 -Did you really try? No wonder it all ended in war. 6-7 -You did at least something right, even though it all still ended in war. 8-9 -You coerced them well, but unfortunately the peace won't last. 10 -Exellent job! Just one full tribe of doubters will send your efforts down the drain. 11 -Unbelieveable! Is it even possible? You should have cheated somehow.. - HOSTILE MODE - 2 -Poor job. The war is propably already underway.. 3 -Not much to celebrate. 4 -Well done in the middle of violence. 5 -Exellent. You should be proud if you never attacked. 6 -Unbelieveable dance on the edge of a blade - and just defending!
Hint:
There are some ''buffer zone'' areas designed to be hard for computer players to conquer - leading to some more variance to the play along with other benefits. If you get stuck, demolish some smaller buildings from the problematic location and check if there can be a big building instead. Some areas are also designed to be impasses with alternative path around them. Unlike in Tasmanian Black War, on this map a player can sail round it.
Comment by uploader:
I made this with b21. At least with it there's an issue with one harbor location. You can build there but never get supplies afterwards. I tried a bit different location on the same peninsula but it didn't help. I hope that's not the case with later versions. In case it isn't useable, you can count it as a successful gaining of the nearby residing artefact if you can keep that harbor there.
Basic Information:
| Author: | Solstice |
| World: | One World |
| Dimensions: | 240 x 496 |
| Max. Players: | 8 |
| Downloads: | 784 |
| Comments: | 1 |
| Rating: | |
| Upload: | by Solstice_s_Return at 2022-01-29, 22:51 UTC+1.0 |
Comments on this Map:
Reply to Original:
Log in to post comments!
kaputtnik
Great map! Played it with HQ_Hunter win condition and have to always keep an eye on searching resources. Resources are very rare on this map but i think it is intentional and makes it a challenge.
Many Thanks!